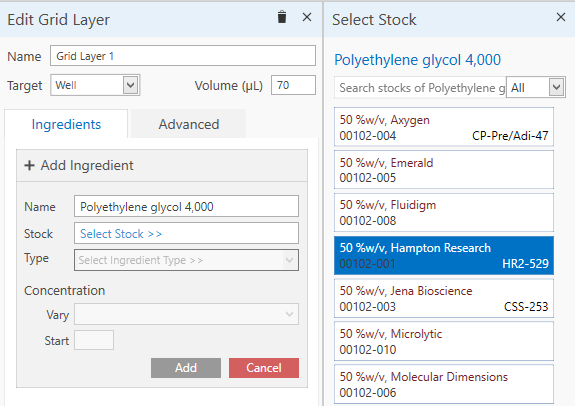
Grid layers allow you to vary the concentrations and pH levels of ingredients in incremental steps along the rows and columns of a layer, as well as from one layer to another through the use of sub-layers.
The idea behind a grid layer is that through experimentation you have found a combination of ingredients that has started to produce crystals, and you want to optimize that condition in an organized, controlled fashion. The best way to do this is to use a grid layer to vary each of the ingredient combinations to a certain degree until you find the optimal crystal-forming conditions.

Edit Grid Layer side panel
After you create a grid layer, you can add one or more sub-layers to it. A sub-layer is a copy of a grid layer. While the rows and columns of the original grid allow for methodical variation in two dimensions, the addition of sub-layers allows for a third dimension of variation. A sub-layer grid will contain the same ingredients found in the original grid, and it will be of the same size as the original. When you resize one sub-layer, all related sub-layers will be resized as well.
Grid layers automatically vary the concentration or pH of an ingredient. You type a start value and a stop value, and then specify where you want the variation to occur (for example, along a row or down a column) by selecting a value from the Vary list.
You have the following options for varying concentrations:
When you select None, there will be no variation. The start value will be used in all wells of the grid.
When you select Row, variation will occur along each row in equidistant steps beginning with the start value and ending with the stop value.
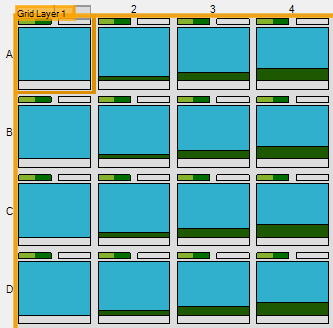
When you select Column, variation will occur along each column from the start value to the stop value.
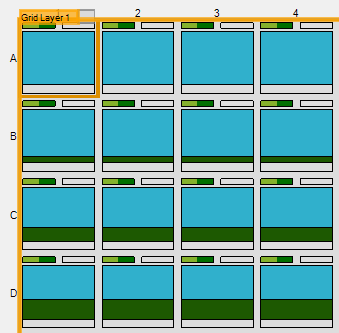
When you select Sub-layer, variation will occur from each sub-layer to the next. Every well in each sub-layer will be assigned the same value, which will increment in equidistant steps between the start and stop values.

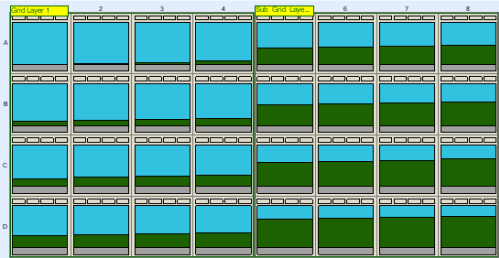
When you select Well Number, variation will occur from well to well. To determine the increment, Rock Maker looks at the total number of wells in the grid, as well as all wells in any sub-layers. The first well of the grid will receive the start value, and the last well of the grid or sub-layer will receive the stop value. All wells in between will be incremented in even steps. The following example illustrates this using a single grid.
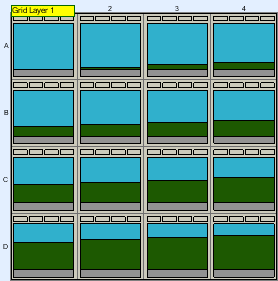
The following example illustrates variation along well numbers across a grid and one sub-layer. Note that variation continues from the last well of the first grid to the first well of the sub-layer.
Custom variation allows you to define the volume or concentration for each well using a spreadsheet editor. When you are done making changes, save the file and close the spreadsheet editor. The Canvas will update accordingly.